Kubernetes/OpenShift Resource Protection with Limit Ranges and Resource Quotas
One of the most crucial metrics of success for an enterprise application platform is if the platform can protect: a) the applications running on it, and b) itself (and its underlying infrastructure). All threats to an application platform eventually come from something within that platform – an application can be hacked, and then it attacks other applications; or there could be a privilege escalation attack going after the underlying host infrastructure; or an application can accidentally hoard platform resources, choking out other apps from being able to run.
The solution to this is some amount of isolation – like quarantining someone who’s sick so they don’t get other people sick. And one of the reasons we love OpenShift is that it does exactly this – it effectively isolates applications. On OpenShift, applications can operate in their defined box o’ resources, and they usually can’t destroy each other or the underlying platform.
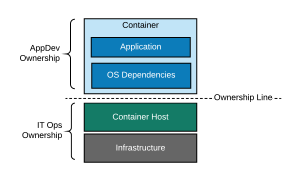
In addition to keeping the applications, the platform, and the infrastructure more secure, this also enables the power of ownership and at least one piece of the goal that is “DevOps.” Because applications are inherently more isolated, infrastructure admins can spend less time and energy worrying about applications, and more time focusing on keeping the platform healthy and secure.
This is part of why developer self-service is possible, because the applications in one namespace/project can’t easily hurt the applications in another. One of the most important pieces of any Kubernetes-based container platform being successful is properly setting up resource boundaries and sandboxing. In OpenShift, these resource boundaries are called LimitRanges and ResourceQuotas. These are set at the project level – and it’s super important to set these limits on every project. You never know when someone will deploy some really inefficient code or have a massive increase in workload – and that’s the great part about these. You don’t have to know.
Like many OpenShift features, these are also part of Kubernetes itself. Pretty much everything we’ll say from here on out applies to Kubernetes as much as OpenShift.
Overview
Clusters (running instances of OpenShift) have physical limitations for their CPU and memory. Somewhere under each cluster is some real hardware that has an actual, real maximum amount of resources because of what the hardware contains. Within a cluster, are projects (namespaces, buckets in which applications are logically grouped) which contain pods (running instances of an application).
There are three different types of resource boundaries in OpenShift. Collectively, they’re sometimes called “capping.”
- Resource Quotas – these are boundaries around CPU, memory, storage, and object counts as a total for a single project. This would translate to, “Project X can have 4 cores to play with, and we don’t particularly care what they do with it.”
- Limit Ranges – these are maximum, minimum, and sometimes default values that specific types of objects can have when they start up, also set for a single project. If any defined type of object (pods, containers, images, a few more) tries to start up outside these values, they won’t be able to. This would translate to, “Within Project X, pods may have between 0.5 cores and 1 core when they start up.”
- Resource Requests and Resource Limits – Pod-specific definitions that declare the amount of resources a pod has dibs on (requests) and promises not to use more than (limits). These are on the pod object specification.
- Quotas also have resource requests and resource limits – but as a total for the entire project. That’s how the CPU, memory, and storage values are expressed.
The different types of capping all work together in a kind of hierarchy. Limit Ranges must work within the boundaries defined by the Resource Quota, and Resource Requests and Resource Limits are…well, limited by both Limit Ranges and Resource Quotas.
In general, we recommend keeping the limits pretty lax unless you’re willing to do a whole lot of tuning and testing. The idea is general protection and defined boundaries, not perfect puppet strings.
OpenShift will allow a cluster to overcommit on resource limits (how much of a resource will be used by an object), but it’s impossible to overcommit resource requests (how much of a resource can be claimed at startup of an object). Any attempt to start an object (we’ll talk mostly about pods from here on out, just for simplicity’s sake – but OpenShift’s capping is intricate and can apply to more objects as well) using a resource request higher than the total resource request for the project (which is defined on the resource quota) will cause the pod to fail to start. So…it’s very important to carefully do some math to set the resource requests on the quota for the project – because otherwise pods won’t start.

What is Overcommitting? Why would you want to Overcommit?
Overcommitting is allowing the sum of all the possible defined resource boundaries to be higher than the physical resources of the OpenShift cluster. This can be done with both Memory and CPU limits. This would happen if limits were set such that if every project on a cluster were to reach its defined limit, the cluster’s would run out of physical compute capacity.
Overcommitting: allowing the sum of all the possible defined resource boundaries to be higher than the physical resources of the OpenShift cluster.
What happens when this is done? Well…nothing explodes, actually. The cluster will hand out CPU in priority order, and things will slow down a bit – but they don’t stop. If the cluster runs out of CPU, it divides what CPU it has available between all nodes – per the CPU resource limits set per pod. OpenShift doesn’t allow any one application to eat all CPU – assuming you let your applications all have the same priority, which is the default. Like everything else in OpenShift, there’s a way to change the default and it’s probably not what you want to do.
So why would you want to overcommit? Well, it’s either that, or build out a cluster that can handle the maximum capacity limit of every application, all the time. Applications are not going to typically run quite this hot, so…it’s usually a waste of hardware to do that. We could write a whole other blog post about capacity and capacity planning, but as a very loose guideline – shoot for 25% more capacity than your average daily peak load, and plot usage trends over time so you know when you need to add more. In addition, monitor pod count and memory usage, and find out if your limiting factor – what your applications eat up the most of – is memory or CPU.
Example: StarBuilder
Let’s walk through some examples to play with these concepts.
An app team (StarBuilder Dev Team) has a sweet application, StarMaker, that creates stars, writes them to the Universe database, and notifies the universe when a new star is created.
Their application runs in a OpenShift cluster, in the project StarBuilder. There are also other projects in the cluster: PlanetBuilder, AsteroidBuilder, and MoonBuilder.
The cluster has a physical limitation of 120 cores and 1024 GB of memory, for these 4 projects that are running.

StarBuilder’s Quota – Resource Limit and Pod Count
The cluster admins have set quotas on each project, which include CPU and memory resource limits, and a total allowed pod count. These resource limits require pods to also have resource limits.
StarBuilder CPU Resource Limit: 100 cores
Remember, project-level CPU resource limits as defined by a quota translates to the maximum total amount of CPU a project can use – measured by the sum of the defined resource limits of its pods. So, in this case, if pod CPU resource limits were set at 1 core each, we couldn’t run more than 100 pods. This lines up nicely with the maximum number of pods in the project.
As mentioned above, cluster physical resources can be over-committed on CPU and memory over what’s actually available. In this case, the total project limits come out to (100 + 50 + 200 + 50) 400 cores, but the cluster’s physical capacity is only 120 cores. If the cluster runs out of CPU because of this, like we said – it will divide the CPU it has available between all nodes – per the CPU resource limits set per pod.
However, a limit of 100 cores for the StarBuilder project leaves plenty of cluster capacity left over even if the entire project’s apps all have CPU issues.
StarBuilder’s Quota – Resource Request
Let’s say we set the StarBuilder’s project CPU resource request to be 20 cores. Remember, wecannot overcommit resource requests, so the sum of all resource requests across all projects can’t be more than 120.
StarBuilder’s CPU Resource Request: 20 cores
Because cluster resource requests set on project quotas cannot be overcommitted, it’s important to evenly divide cluster resource requests between projects relative to how much actual resources on the cluster each project is likely to need.
Scenarios
Let’s play around with some attempts to cap CPU and walk through what would happen.
Try #1: CPU Resource Limit only
The StarBuilder Team sets their CPU resource limit to 1 core as a default on all pods. They don’t set a default CPU resource request for pods.
…unfortunately, if no resource request is provided for a pod, Kubernetes uses the limit as the request. This means that their pods now call dibs on (request) 1 full core when they start – because that’s what the limit is set to. The project only has 20 cores at its disposal for dibs’ing, so…whenever the project tries to start its 21st pod, it and all future pods definitely won’t start.
Try #2: CPU Resource Limit AND CPU Resource Request
The StarBuilder Team sets their CPU resource request .01 cores for each pod. The pod starts up with .01 core allocated to it, and it can flex up to its resource limit, which is still set to 1 core.
They scale up their application to thirty pods, which means their project now has allocated 30 cores of CPU resource limit and .3 cores of CPU resource request. So far so good!
They start allowing requests into their application, and under heavy load their pods run up to 1 core each, for that resource limit total of 30 cores, and the cluster is largely unaffected while this extra load happens.
Tada! Quota success!
More Applications: StarConfigurator and StarAnalyzer
Okay, ready for more applications within this project?
Team StarBuilder makes a second app in their project to join the StarMaker application: StarConfigurator, which is an app that can be use to customize star attributes and dimensions. They also make a third application, StarAnalyzer, which does analytics on stars and on the star database.
They attempt to spin up 20 more pods, 10 for each of the new apps – using the same pod resource limit of 1 core/pod and resource request of .01 core/pod. This is an addition of 20 cores of CPU resource limit and .20 cores of resource request.
This brings them to a total of 50 cores of CPU resource limit used of their 100 allowed, and .5 cores of CPU resource request used of their 20 allowed. Still rocking and rolling.
Going Forward with this Cluster: What Limits Mean for Projects
Let’s say each project has a CPU resource request of 20 cores. This means that the the cluster is maxed out at 6 projects (each project has 20 cores guaranteed to it, so 120 physical cores/20 cores per project = 6 projects).
Also, if the MoonBuilder project (resource limit of 200 cores) has all of its applications go crazy all at once, then the cluster will have CPU constraint issues because it only has 120 physical cores. If this happens, apps will split the CPU according to the ratio of their CPU resource limits. This is another good practice: size your cluster larger than the CPU and Memory request maximums of your largest project.
If you size clusters this way, and implement CPU resource limits, other applications and other projects are more or less kept safe from each other – and there’s a plan for how OpenShift will automatically allocate the physical resources that exist if something goes rogue.
Non-Production Clusters: Resource Limits and Load Testing
Non-Production clusters function just like the example. Typically “environments,” like the standard Dev, User, Staging, etc, are reflected with different projects in OpenShift. Because of this, non-Production clusters tend to have many more pods. This probably means pods will need to have low default resource requests.
However, you can do some neat science via load testing based on pods with CPU resource limits set. You can watch the magic of OpenShift knowing what to do if a pod or project hits its resource limit – and you also get some kind of amazing consistency where, for example, if a pod is limited to .75 cores in non-production and can serve 500 requests/second, you can expect that a pod in Production also limited to .75 cores will also serve 500 requests/second.
And as another super nerd cool side benefit, load testing should be able to be done at any time during the day if you have resource limits set up correctly – because those resource limits will prevent a single application from using all resources available to all applications.
Some Advice
Again, our general advice is to keep capping – especially the quotas and limit rages – pretty lax unless you’re willing to do a lot of tuning and testing. You want to keep badly performing apps from stepping all over each other, not perfectly tune applications for their average load. There are days when your company does a lot of business, and days that programmers are able to deliver faster and more efficiently, and both of those mean that ultimately you want the flexibility to use more resources without the slowdown of asking for permission.
We also recommend overcommitting on resource limits – not every app will have its worst day all at once. We recommend this so that you don’t have to have physical capacity for the cluster as though every application will always have its worst day.
Finally, have a nice buffer of physical capacity in your clusters if you aren’t auto-scaling the cluster. We recommend at least a 25% buffer over average load – for flexibility, workload growth, and high-transaction-workload days – and keep an eye on the capacity usage via some kind of capacity planning. OpenShift lets people go much faster than they could before, and that will be reflected in what can be a surprising rate of growth at first.
Try it Yourself!
Thanks to Katacoda, you can play with Kubernetes limits yourself!
https://kubernetes.io/docs/tasks/administer-cluster/quota-api-object/
2 Replies to “Kubernetes/OpenShift Resource Protection with Limit Ranges and Resource Quotas”
Long time reader, first time commenter — so, thought I’d drop a comment..
— and at the same time ask for a favor.
Your wordpress site is very simplistic – hope you don’t mind me asking what theme you’re using?
(and don’t mind if I steal it? :P)
I just launched my small businesses site –also built in wordpress
like yours– but the theme slows (!) the site down quite a bit.
In case you have a minute, you can find it by searching for “royal cbd” on Google (would appreciate any feedback)
Keep up the good work– and take care of yourself during the coronavirus scare!
~Justin
We took a simple theme and then customized it quite a bit, actually – which makes it hard to steal! Perk and also semi-curse of working in IT, I think… 😀 I’d recommend just checking out the themes available to you, pick one that does roughly what you want, and either commit to it wholeheartedly or…learn PHP. You can also pay people to do custom themes for you if that seems like a thing that you might need. Good luck, and thanks for commenting (and reading!).